- RHEL and Compatibles, Fedora (RPM Fusion): VirtualBox-server, VirtualBox-webservice
- OpenSUSE: virtualbox-websrv
- Ubuntu, Mint: Use the official VirtualBox packages as the Ubuntu packages are missing some components entirely.
Getting Started
The documentation assumes the following:
- If the server is firewalled, port 18083 (tcp) is able to accept connections from your RemoteBox client.
- VirtualBox is installed, including The Oracle VM VirtualBox Extension Pack. Some distributions provide their own VirtualBox packages which should be fine in general however, however this documentation assumes the official package has been installed.
- The steps are performed with sufficient root or administrator privileges
The vboxwebsrv Agent
For example, if the agent is running as the user joe, then you will see Joe's virtual machines and configuration, regardless of the credentials you connected with. It's also worth mentioning that extensions such as the Oracle VM VirtualBox Extension Pack may also need to be installed as this user, so that it's available in their configuration. You may already have an existing user you wish to use, or you can create a new one specifically for the purpose. If you are not sure how to create a user, please consult the documentation for your operating system.
For the purposes of this documentation, we will use the following values in the examples, however remember to change them to suit your setup.
| vboxwebsrvuser: | virtualuser • This user should also be a member of the vboxusers group. This group is usually created by VirtualBox at install time |
| Server Name: | myserver.example.com |
| Server IP Address: | 192.168.1.10 |
| Default TCP Port: | 18083 |
The Main Configuration
• Create the log directory and the set the correct ownership. The web service will not start if it cannot write to the log file.
mkdir -p /var/log/vbox
chown virtualuser:vboxusers /var/log/vbox
• Edit or create the following configuration file, using your preferred text editor
/etc/default/virtualbox
• Add the following contents to the configuration file, adjusting the values as appropriate for your setup. You can use the IP address instead of the hostname, if your hostname is not in DNS
VBOXWEB_USER="virtualuser"
VBOXWEB_TIMEOUT=0
VBOXWEB_LOGFILE="/var/log/vbox/vboxweb.log"
VBOXWEB_HOST="myserver.example.com"
• Enable the service and start it.
systemctl enable vboxweb-service
systemctl start vboxweb-service
• If the agent has started correctly, you should see it in the process table when you run
ps -aef | grep vboxwebsrv
If the service fails to start, recheck the configuration steps. Checking the contents of /var/log/vbox/vboxweb.log may also give additional clues. You should now be able to connect to the server using the RemoteBox client.
Optional: Auto-Starting Guests on Server Boot
• Edit or create the following configuration file, using your preferred text editor
/etc/default/vb-autostart-perms
• Add the following contents to the configuration file
default_policy = allow
• Set the correct file permissions and create the autostart database
chmod 0644 /etc/default/vb-autostart-perms
chown virtualuser:vboxusers /etc/default/vb-autostart-perms
mkdir -p /var/lib/virtualbox-autostart
chmod 1777 /var/lib/virtualbox-autostart
chown virtualuser:vboxusers /var/lib/virtualbox-autostart
• Edit the main configuration file with your preferred text editor to add the configuration options
/etc/default/virtualbox
• Add the following contents to the configuration file
VBOXAUTOSTART_DB="/var/lib/virtualbox-autostart"
VBOXAUTOSTART_CONFIG="/etc/default/vb-autostart-perms"
• Enable and start the auto-start service. You may also need to restart the vboxweb service also.
systemctl enable vboxautostart-service
systemctl start vboxautostart-service
systemctl restart vboxweb-service
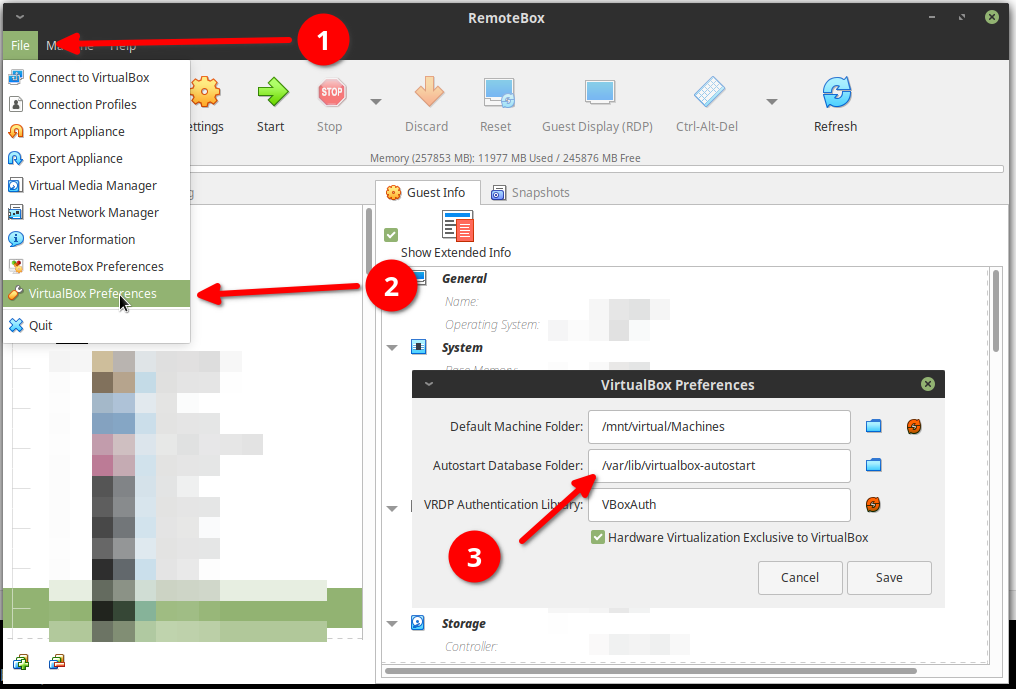
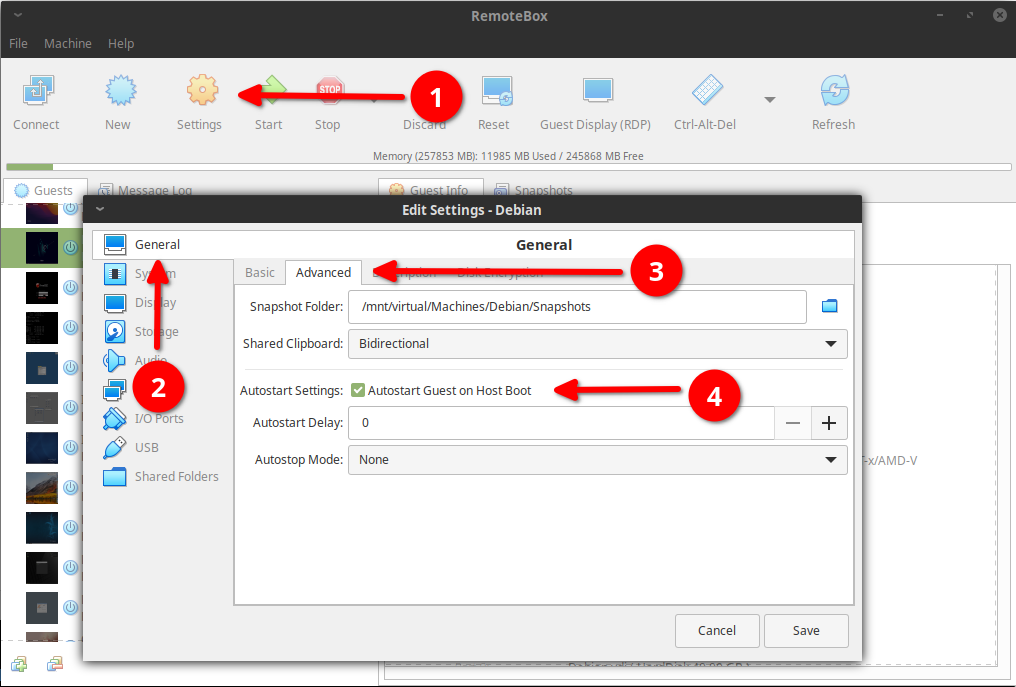
• You will also need to connect to the server with RemoteBox and set your preferences to use these configurations as shown below.

• You will also need to connect to the server with RemoteBox and set your preferences to use these configurations as shown below.

Optional: SSL
• Make a directory on the server where the certificates and keys are to be stored. In these examples, we're running the web service as the user virtualuser, so we will create a directory in that user's homespace.
mkdir /home/virtualuser/vboxwebcerts
• Generate the RSA private key. You will be prompted for a password to use. This example will use changeme as the password
cd /home/virtualuser/vboxwebcerts
openssl genrsa -des3 -out vboxweb.key 1024
• Generate the certificate signing request. You will be prompted for various X.509 attributes for the certificate. Most of them are purely informational, so fill them out as accurately as you see fit, however you should ensure that the 'Common Name' attribute is set to either the fully-qualified hostname of your server, or its IP address. You can leave the 'Challenge Password' empty unless you feel you need it.
cd /home/virtualuser/vboxwebcerts openssl req -new -key vboxweb.key -out vboxweb.csr
• Generate the self-signed certificate.
cd /home/virtualuser/vboxwebcerts
openssl x509 -req -days 365 -in vboxweb.csr -signkey vboxweb.key -out vboxweb.crt
• The VirtualBox web service expects both the private key and the certificate to be in the same file. So combine them as follows
cd /home/virtualuser/vboxwebcerts cat vboxweb.key vboxweb.crt > vboxweb-both.crt
• Using your preferred text editor, create the file /home/virtualuser/vboxwebcerts/vboxweb.pwd containing only your password and ensure the permissions are set correctly.
chown -R virtualuser:vboxusers /home/virtualuser/vboxwebcerts chmod 0600 /home/virtualuser/vboxwebcerts/*
• Edit the web service configuration file /etc/default/virtualbox using your preferred text editor and add the following
VBOXWEB_SSL_PASSWORDFILE="/home/virtualuser/vboxwebcerts/vboxweb.pwd"
VBOXWEB_SSL_KEYFILE="/home/virtualuser/vboxwebcerts/vboxweb-both.crt"
• Restart the web service
systemctl restart vboxweb-service
When connecting to the server from RemoteBox you should now use the https:// prefix.
Optional: Disabling Web Service Authentication
• To disable authentication, run the following command on the server as the same user that the VirtualBox web service runs as:
vboxmanage setproperty websrvauthlibrary null